Nectar Desk Live chat feature is the reliable help desk for your website. If you have an account with Nectar, you can embed this function to your website and chat with its visitors 24/7 – there is no need to use additional services and pay extra.
Let’s dive diver into the setup of live chat
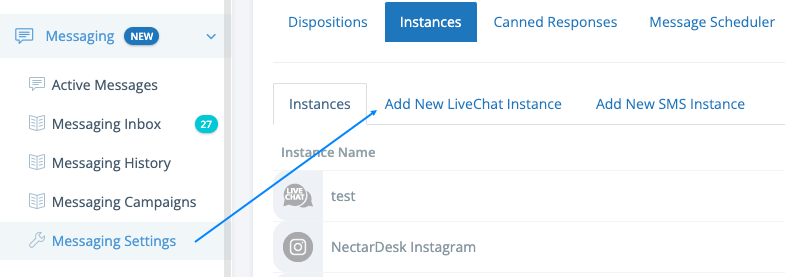
To set it up, please go to the Messaging – Messaging Setting on the left menu and click Add New Live Chat Instance:

What is the Instance?
Some companies have multiple websites and they need separate chat channels for each of them. For such purpose, we’ve added the ability to create a separate instance (live chat channel) with different settings so that chat styles, colors, and welcome messages which may vary in accordance with the website the chat was created for.
Here is what you can set up for your personalized Livechat.
Add additional options such as a callback request

or ticket form if needed

Chat window styles allows you to change your chat window title when the agents are available (logged in to the ND account and ready to answer customers’ questions) as well as when the option is inactive (there are no available agents or this chat is initiated outside of business hours):
You can also create your welcome messages which will be displayed once the website visitor is starting the conversation.
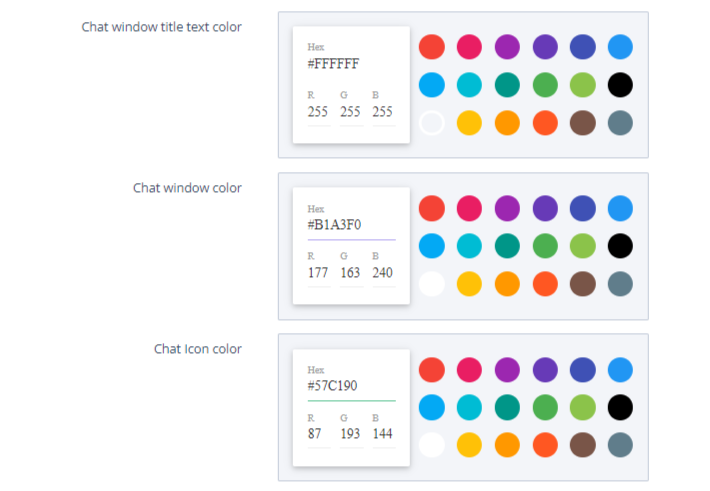
Chat window title text color, chat window color itself, and chat icon color are fully customizable as well – you can choose the colors that will match your website style best and enable or disable the auto-open chat window.

We provide you with a great tool to create your own Live Chat style:

Select the suitable authentication method among the 3 possible variants:
- mandatory login (the website visitor is obliged to log in before starting the conversation)
- mandatory login and option to initiate chat as a guest (the visitor can either log in or start a conversation as a guest)
- allow visitors to initiate chat as guests only.
You can also create Canned Responses to use further, to handle chats with clients quicker.
How to embed the live chat?
Once the live chat instance is created, copy and paste the javascript to the head section of your web page (your website developers will probably do it in a few minutes):

Set up Email Notifications for Live Chat
Receive Email notifications from Live Chat, set up process requires a few clicks.
- If you need to receive notifications from existing chats, follow these steps:
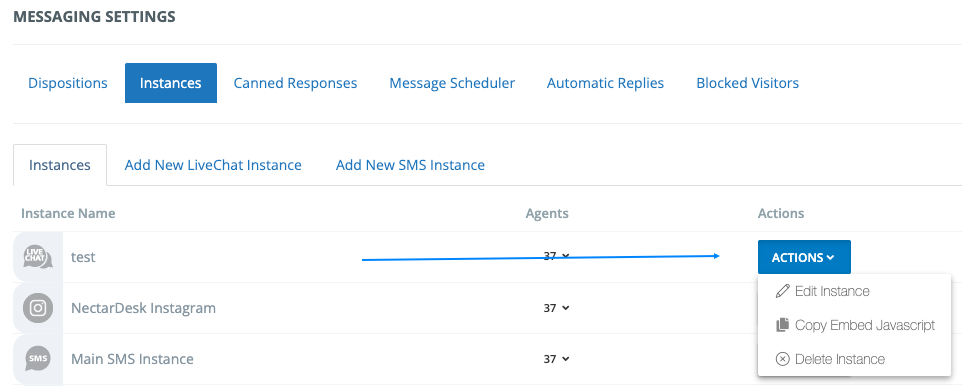
Go to Messaging on the left menu, click “Settings”→ on the top go to “Instances”. Then, click “Action” blue button on the left side, then choose “Edit Instance”. Look at Basic Settings section and write on the last line “Email(s) to receive Notifications” desired email adress. Go to the bottom→ click “Save”.
2. If you desire to add new Live Chat instance, follow that instruction:
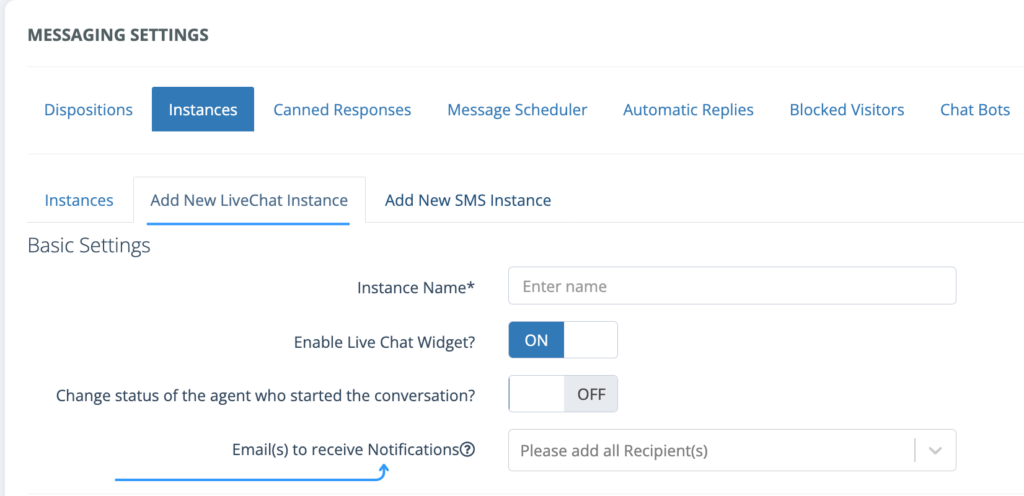
Go to Messaging on the left menu, click “Settings”→ on the top go to “Instances”. You will see three sections, click “Add New LiveChat Instance”. Look at Basic Settings section and write on the last line “Email(s) to receive Notifications” desired email adress. Set up other sections. Go to the bottom→ click “Create Instance”.

Where can you handle your active conversations?
Once the live chat is fully set up and the live chat icon appears on your website, you can handle conversations with clients from your Nectar Desk account.
To do it, please go to Messaging Inbox or click on the notification at the top of the page:

All completed chats can be found in Messaging History. Here you can view the conversation or filter by the agent responsible for it, and find the required one.
Send us your questions to [email protected] and we will be glad to assist you and answer your questions about the Live Chat functionality.


