Google Analytics is one of the most popular digital analytics software. It allows you to analyze in-depth detail about the visitors on your website and provides valuable insights that can help you to shape the success strategy of your business.
In this article, we will explain how to send Nectar Chat user’s events to Google Analytics.
At this point we support the next events:
onChatLoaded – Chatbox has been Loaded
onChatBoxOpened – Chatbox has been Opened
onChatBoxClosed – Chatbox has been Minimized
onMessageSent – Message has been sent
onMessageReceived – Message has been received
Depending on the way you integrate with Google Analytics, your set up process can be slightly different. Let’s cover a few examples.
1. If you add GA tracking code manually using Universal Analytics, our GA tracking code should look like this:
<script async
src=”https://www.googletagmanager.com/gtag/js?id=UA-XXXXXXXXX-1″></script>
<script>
window.dataLayer = window.dataLayer || [];
function gtag(){dataLayer.push(arguments);}
gtag(‘js’, new Date());
gtag(‘config’, ‘UA-XXXXXXXXX-1’);
</script>
UA-XXXXXXXXX-1 – is your GA tracking ID
An example of event tracking code:
<script type=”text/javascript”>
var ndChatSettings = {
onChatLoaded: () => {
gtag(“event”, “onChatLoaded”);
},
onChatBoxOpened: () => {
gtag(“event”, “onChatBoxOpened”);
},
onChatBoxClosed: () => {
gtag(“event”, “onChatBoxClosed”);
},
onMessageSent: () => {
gtag(“event”, “onMessageSent”);
},
onMessageReceived: () => {
gtag(“event”, “onMessageReceived”);
}
};
</script>
2. If you use site builders like  ,
,  , etc and GA code is pre-installed there, your GA tracking code should look like this:
<script>
window.ga=window.ga||function(){(ga.q=ga.q||[]).push(arguments)};ga.l=+new Date;
ga(‘create’, ‘UA-XXXXXXXXX-1’, ‘auto’);
ga(function (tracker) {
const clientId = tracker.get(‘clientId’);
ga(‘set’, ‘dimension1’, clientId);
ga(‘set’, ‘page’, window.location.pathname + window.location.search)
ga(‘send’, ‘pageview’)
})
</script>
<script async src=’https://www.google-analytics.com/analytics.js’></script>
An example of event tracking code:
<script type=”text/javascript”>
var ndChatSettings = {
onChatLoaded: () => {
ga(‘send’, ‘event’, ‘LiveChat’, ‘onChatLoaded’, ”);
},
onChatBoxOpened: () => {
ga(‘send’, ‘event’, ‘LiveChat’, ‘onChatBoxOpened’, ”);
},
onChatBoxClosed: () => {
ga(‘send’, ‘event’, ‘LiveChat’, ‘onChatBoxClosed’, ”);
},
onMessageSent: () => {
ga(‘send’, ‘event’, ‘LiveChat’, ‘onMessageSent’, ”);
},
onMessageReceived: () => {
ga(‘send’, ‘event’, ‘LiveChat’, ‘onMessageReceived’, ”);
}
};
</script>
Where to add the script on the website builder?
Normally this script would be added under the Custom Script section.
3. Using Google Tag Manager
Here’s an example of how to push the event to GA using Google Tag Manager:
Step 1: Add Events Code as a Tag and Trigger it on DOM Ready.

Here’s the code to add:
<script type=”text/javascript”>
var ndChatSettings = {
onChatLoaded: function () {
dataLayer.push({ event: “onChatLoaded” });
},
onChatBoxOpened: function () {
dataLayer.push({ event: “onChatBoxOpened” });
},
onChatBoxClosed: function () {
dataLayer.push({ event: “onChatBoxClosed” });
},
onMessageSent: function () {
dataLayer.push({ event: “onMessageSent” });
},
onMessageReceived: function () {
dataLayer.push({ event: “onMessageReceived” });
}
};
</script>
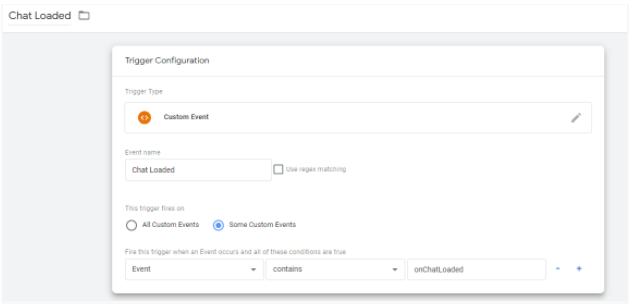
Step 2: Create a Trigger for the event you want to push like in the example below:

Step 3: Create Tag with the appropriate Event using Google Analytics Events like in the example below. Pick the appropriate Trigger.

Step 4: Publish changes you’ve just done.
Please contact us via the Live Chat on this page if you need any assistance.


